Table of Contents
Creating a solar system drawing for your school project can be both fun and educational! This project not only helps you understand the planets and their orbits but also gives you a chance to showcase your creativity. In this guide, we will walk you through the process of drawing an accurate and eye-catching solar system.
Introduction: Importance of a Solar System Drawing for School Project


A solar system drawing is an essential part of many science projects, helping students understand the structure of our universe. This project involves representing the Sun, planets, and other celestial bodies in a visually appealing way. By using simple drawing techniques, you can create a project that combines both art and science.
Materials Needed for Solar System Drawing
Before starting your solar system drawing for school project, ensure you have all the necessary materials to create an accurate and colorful design:
Drawing Tools:
- Pencil (HB or 2B for sketching)
- Eraser for corrections
- Colored pencils or markers for bright, accurate coloring
- Ruler and compass for precision
Paper: A large drawing sheet or poster board
Optional:
- Glitter or metallic pens for detailing
- Black construction paper for a starry background


Step-by-Step Process to Create a Solar System Drawing
Step 1: Draw the Sun for Your Solar System Project
Start by drawing a large Sun on the left side of your paper, as it is the center of your solar system. Make sure the Sun is large enough to emphasize its importance.
Details: Add rays around the Sun to represent its brightness. You can also add light shading for a glowing effect.

Also Check: File Decoration Ideas for School Project
Step 2: Draw the Planet Orbits for Solar System
Use a compass to create several concentric circles around the Sun. These circles represent the orbits of each planet.

Spacing: Ensure the orbits are proportional to the distance from the Sun, with the inner planets closer and outer planets farther away.
Step 3: Add Planets in the Solar System
Draw a circle for each planet along its respective orbit. Make sure to place them in the correct order from the Sun:
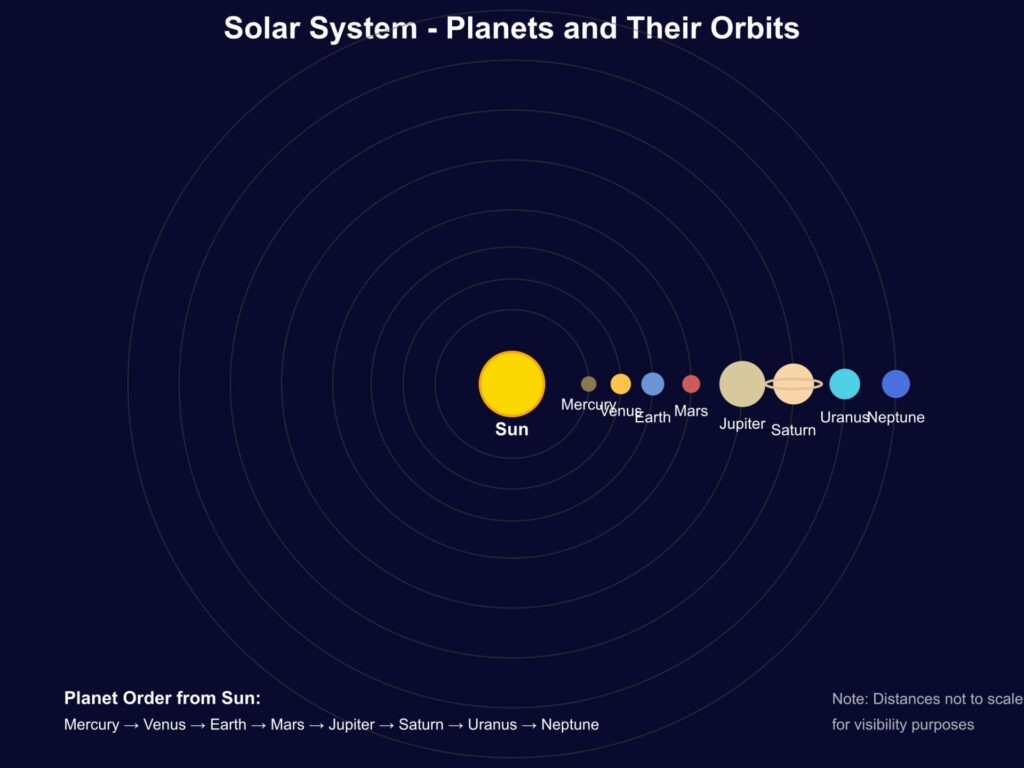
Order of Planets: Mercury, Venus, Earth, Mars, Jupiter, Saturn, Uranus, Neptune.
Step 4: Detail the Planets for Your Solar System Drawing
Each planet has unique characteristics. Make sure to differentiate them:
- Mercury: Small, greyish with craters
- Venus: Yellowish with cloud patterns
- Earth: Blue with green continents
- Mars: Red with surface features
- Jupiter: Large with the Great Red Spot
- Saturn: Yellow with rings
- Uranus: Light blue with a tilted axis
- Neptune: Dark blue with clouds
Step 5: Add Moons and Rings to Your Solar System Drawing
If the planets have moons (such as Earth or Jupiter), draw small circles around them. You can also add rings to Saturn by drawing oval shapes around the planet.
Step 6: Color Your Solar System Drawing
Use bright, vibrant colors for each planet to bring your solar system project drawing to life. Don’t forget to color the Sun with bright yellows and oranges to highlight its importance.
Tip: Use glitter pens or metallic markers to add sparkle to the stars and other celestial bodies in the background.
Additional Tips for a Stunning Solar System Project
- Accuracy: Ensure the sizes and distances between planets are somewhat proportional for educational accuracy.
- Creativity: Add artistic touches like stars, comets, or spacecraft to make your drawing more visually interesting.
- Presentation: Once completed, mount your drawing on a sturdy board to present it professionally.
Related Links
- Science Project Ideas for Class 5 Students
- Science Project Ideas For Class 6
- Science Project Ideas For Class 9
- Science Project Ideas For Class 10
Conclusion
Your solar system drawing for school project is more than just an art piece. It’s a fun way to engage with science while displaying your creativity. By following these steps and adding some personal touches, you can create a visually appealing and educational project that will impress your classmates and teachers alike.
FAQs on Solar System Drawing for School Project
How to make a drawing of a solar system?
To make a drawing of the solar system, follow these steps: Draw the Sun: Place a large circle on the left side of your paper to represent the Sun. Add Orbits: Use a compass to draw concentric circles around the Sun. These represent the orbits of the planets. Draw the Planets: Add planets along each orbit, from Mercury closest to the Sun, to Neptune at the farthest. Detail the Planets: Color the planets using accurate colors for each. For example, Earth should be blue with green continents, while Jupiter has distinctive brown and white bands. Add Moons and Rings: Include moons for planets like Earth and Jupiter, and draw Saturn's iconic rings. Label the Planets: Write the names of the planets near their corresponding circles.
How to do a solar system project for school?
To complete a solar system project for school: Research: Start by learning about the solar system, including each planet's features, size, and order from the Sun. Plan Your Project: Choose whether you want to do a drawing, model, or presentation. You can create a 3D model of the solar system using styrofoam balls or a poster with drawings. Create a Visual Representation: For a drawing, follow the steps to make an accurate and visually appealing solar system. For a model, paint the balls representing each planet and arrange them in the correct order. Add Details: Include information about each planet’s unique characteristics and any relevant data (such as the distance from the Sun, size, etc.). Label Everything: Ensure all planets and objects are clearly labeled. If you have a model, label each planet with a name and any additional details. Prepare the Presentation: If required, prepare a brief explanation of your project, highlighting key facts about the solar system.
What is the solar system for class 3 students?
For Class 3 students, the solar system is the collection of planets and other celestial objects that orbit the Sun. The solar system includes: The Sun: A massive star at the center of the system. Planets: There are eight planets Mercury, Venus, Earth, Mars, Jupiter, Saturn, Uranus, and Neptune that orbit the Sun in order. Moons: Many planets have moons that orbit them, like Earth’s Moon. Other Objects: This includes asteroids, comets, and dwarf planets like Pluto. A simple diagram or a 3D model helps students visualize the solar system and its components, helping them better understand their relative positions.
How do you make a simple solar system?
Making a simple solar system for a school project can be done in a few easy steps: Draw or Create a Model: For a drawing, sketch the Sun on one side and planets on their orbits. For a model, use small balls (or styrofoam balls) for the planets and arrange them in order on sticks or wire. Color the Planets: Use colors that represent the planets accurately, like blue for Earth, red for Mars, and yellow for Jupiter. Label: Write the name of each planet next to it. Add Details: If you want to get creative, add accessories like Saturn's rings or Earth’s continents on your drawing.