Table of Contents
Your ordinary scale is capable of measuring length upto an accuracy of 1mm. It means with an ordinary scale you can measure length of a pencil as 12 mm, 13mm, 14mm, 15mm, 16 mm etc. Your measurement can give you, say 12.5 mm provided the last digit 5 is obtained using a guess work. Vernier calipers is an intelligently built measuring instrument that increases accuracy of length measurement upto 0.1mm or even better. With a vernier calipers, you can measure the length of pencil as 12.1 mm, 12.2 mm, 12.3 mm etc…
Mechanism of making measurements
First let us understand the mechanism we use for making measurements with our naked eye. Recall how you measure the length of a pencil using a normal scale. Generally, we make measurements with the help of scales that already have marks on them with known length of gaps between adjacent marks. We keep the object, say a pencil, parallel to the scale and we rely on “coincidence of marks of the scale with the ends of the pencil”. These coinciding marks of the scale then become our observations that we note down and use them to calculate the length of pencil.
For example, if ends of pencil coincide with 12 mm and 152 mm marks, then length of the pencil is 152 mm – 12 mm = 140 mm.
Principle of Vernier calipers
Pierre Vernier (the inventor of Vernier Calipers) gave an innovative idea of length measurement by making use of two scales instead of one.
- Suppose you keep two scales side by side parallel to their length. The length of gap between adjacent marks on one scale is different from that on the other scale. So gap lengths on the two scales are not identical but they are very close. The closer to being identical, the better, but NOT identical. This is the important point!
- One scale (call it as scale A) has adjacent marks on it separated by 1mm and the other scale (call it as scale B) has adjacent marks on it separated by 0.9 mm.
- These scales are arranged such that one scale (B) can slide parallel to their length while the other scale (A) remains fixed.
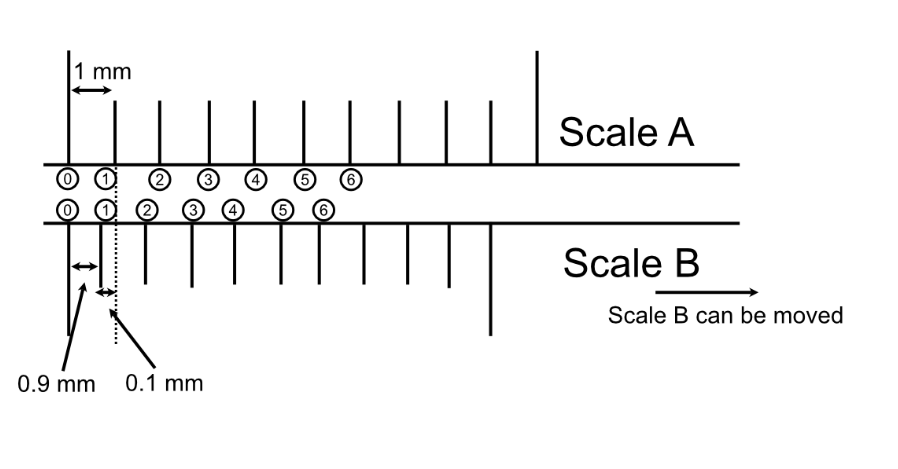
- Assume initially both scales had their initial marks (marked ) coinciding, as shown in the figure. At this time, their next marks (marked as (1)) will not be coinciding. There is a small gap between them as shown in the figure.
- Also note that gap between (1) and (1) is less than that between (2) and (2) and so on.
- How much will the length of least gap – that is between (1) and -(1) be?It will be 1 mm – 0.9 mm = 0.1mm, as shown in the diagram.
- Now if we move the scale B towards right to make both the (1) marks coincide, clearly we have moved by a distance of 0.1 mm. But notice that this distance moved is a KNOWN DISTANCE. This is the least distance moved between two below events:
- First event (coincidence of (0) marks)
- Second event (coincidence of (1) marks).
So, you see, here is the idea – by making use of these two scales, you can move a least measurable distance of 0.1 mm. You could have moved by a distance lesser than that but it will NOT be a measurable because you will not get coincidences between marks of the two scales.
- So usage of two scales having slightly different gap lengths has helped us measure 0.1 mm movement.
- Think again! If you use only a single ordinary scale, you cannot measure movement of a point body against this scale by less than 1 mm. The measurable movement will be 1 mm, 2 mm, 3 mm or so on..
- Whereas using the above two-scale device, you can measure movements of 0.1 mm, 0.2 mm, 0.3 mm and so on.
- First event (coincidence of (0)marks)
- Second event (coincidence of (2) marks).
Above will give rise to a movement of 0.2 mm.
Schematic diagram of a Vernier Calipers
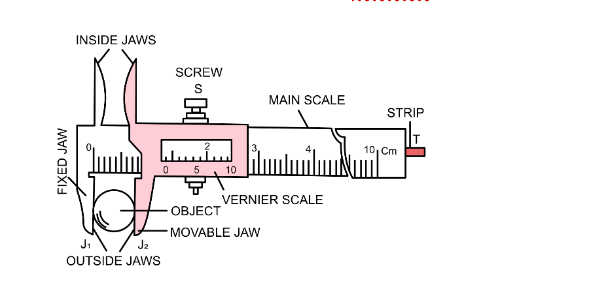
Main components of a Vernier Calipers.
- Vernier calipers are generally made of stainless steel.
- The inner sides of OUTSIDE JAWS are made parallel. We can keep object between them whose length, external diameter etc need to be measured.
- The outer sides of INSIDE JAWS are parallel. We can use these jaws so that they press against inner wall of a hollow cylinder in order to measure its internal diameter.
- MAIN SCALE: Main scale contains markings similar to those on an ordinary scale (separated by 1 mm).
- VERNIER SCALE: Vernier scale is a movable scale. It can slide on the main scale and it surrounds the main scale on front and back, as shown in the figure. Vernier scale can be pushed to extreme left so that jaws touch each other. This situation indicates absence of an object between the jaws. As you can see, we slide the vernier scale to create a gap between the jaws to keep object between the OUTSIDE JAWS or to hold a hollow object by using INSIDE JAWS.
- STRIP: Shown in the figure as a small protrusion in the diagram, on extreme right, is actually a long, metallic strip parallel to the main scale. The strip can move relative to the main scale. Using the strip, we can measure inner height of the hollow cylinders. Vernier calipers, being big, cannot go inside small hollow cylinders. Strip, being thin, is put inside the cylinder and readings are taken.
What does the word DIVISION mean while discussing about vernier calipers?
It is important to understand it because the word DIVISION is used to convey different meanings, depending on the context in which it is said.
- It is the length of gap between adjacent markings on a scale.
So when we write 9 Main scale division = 10 Vernier scale division. Here we are conveying that length of 9 main scale gaps is equal to length of 10 vernier scale gaps. - When we say first division of vernier scale coincides with a mark on the main scale, then we mean second (first + 1) mark on the vernier scale coincides with a mark on the main scale.
- Vernier coinciding division is 6. It means 7th (6+1) mark of vernier scale coincides with a mark on the main scale.
Types of vernier calipers available
- Popularly used Vernier calipers have markings on main scale and on vernier scale such that length of nine main scale divisions is equal to length of ten vernier scale divisions.
- But we also have calipers wherein length of nineteen main scale divisions is equal to length of twenty vernier scale divisions OR
| Main scale divisions | Vernier scale divisions |
| 9 | 10 |
| 19 | 20 |
| 29 | 30 |
- Length of twenty nine main scale divisions is equal to length of thirty vernier scale divisions.
- So, in general, length of n main scale divisions is equal to length of (n+1) vernier scale divisions.
Why is (9-10) combination vernier calipers more popular?
The Vernier calipers with (9-10) combination is popular because:
- For level of accuracies needed in normal lab measurements, it serves the purpose. It also helps students to learn the concept and working of vernier calipers easily.
- The other combinations (19-20) and (29-30) are better in terms of accuracies than the (9-10), but markings on them are too close to be easily observed with the naked eye. Many times we need help of lenses to make measurements (for example to know which of the divisions – 35th or 36th or 37th – is coinciding. With a naked eye, they may all look coinciding).
Least Count of a vernier calipers
Least count is the least length that can be measured by a vernier calipers.
In general, length of n main scale divisions is equal to length of (n+1) vernier scale divisions. In other words, the number of vernier scale divisions is kept one greater than those on main scale. This arrangement gives the smallest possible least count. Smallest possible least count refers to best accuracy.
For example, if you have a vernier calipers wherein length of main scale divisions is equal to say length of (n+2) or (n-1) or (n-2) vernier scale divisions, then the least count will be greater than that with n vs(n+1) combination.
Remember, the lesser the least count, the better is the instrument, in terms of accuracy.
Let us find out least count of (9-10) Vernier calipers.
The total length of nine main scale divisions is equal to length of ten vernier scale divisions.
9 main scale division = 10 vernier scale division
OR
9 M.S.D. = 10 V.S.D.
= 1 V.S.D. = 9/10 M.S.D.
But
1 M.S.D. = 1mm
= 1 V.S.D. = 9/10mm
As we showed in the beginning of the article, the least measurable distance is the difference between 1 main scale division and one vernier scale division.
Least count of a vernier calipers = 1 M.S.D. -1 V.S.D.(Remember this formula!)
Least count = 1mm – 9/10mm
Least count = 0.1mm
Least count of (19-20) vernier calipers is 0.05mm (you can apply the above formula and work it out yourself!). You can see that its least count is lesser than that of (9-10) vernier calipers. So (19-20) is a better instrument than (9-10) instrument.
Zero error of a vernier calipers
Ideally your ordinary scale should have marks commencing from zero. But let us say the first part of your ordinary scale is broken, you can see markings on it only starting from 5 cm mark, as shown in the figure.
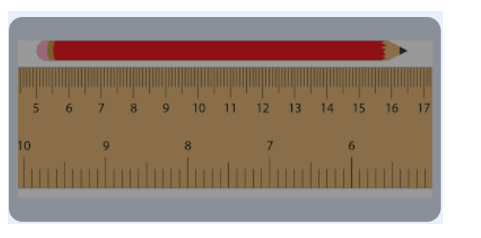
Let us say the length of a pencil is 11.5 cm. You can still use your broken scale to measure the length of a 11.5 cm pencil, by keeping the pencil starting from 5cm mark. But end point of the pencil will now coincide with 16.5 cm mark. To calculate the length of the pencil, you will have to now subtract 5 cm from the 16.5 cm to get its correct length as 11.5 cm.
Notice that 5cm is the error in your ordinary scale due to its breaking. This error is called zero error. Why? It is because your reference of measurement is shifted from usual zero mark to 5 cm. Hence it is called zero error.
Vernier calipers can also have zero error. Zero error arises in a vernier calipers due to defect developed in it while manufacturing it. When the jaws are touched,
- If the zero of the main scale and that of the vernier scale do not coincide, then there is a zero error.
- If the zeroes coincide, then that vernier calipers has no zero error.
Ideal vernier calipers should have its zeroes coincide when the jaws are touched. When the length of an object is to be measured, the vernier scale is moved out and the object is kept fixed between the jaws. Position of zero of the vernier scale is noted.Importance of zero of the vernier:The distance by which the zero of the vernier moves (from the position of jaws-touching-each-other to the position when the object is held firm between the jaws) is equal to the length of the object. Please keep this point in mind.
Zero error in vernier calipers are of two types:
Let us say when the jaws touch, the zeroes coincide. Then you moved the vernier scale and kept the object firmly held between the laws. Keep your focus on the zero of the vernier. Let us say now the zero of the vernier coincides with 20 mm mark on the main scale. So clearly the zero of the vernier moved by a distance equal to 20 mm – 0 mm = 20 mm.
But what if the zeroes did not coincide when the jaws are touched? Here two possibilities arise:
Positive zero error: When the jaws are touched, the zero of the vernier scale is found to be to the RIGHT of zero of main scale, as shown by an example below.
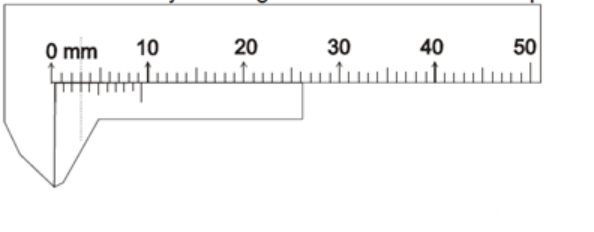
In the above diagram, jaws are touching, but the zero of the vernier scale is found to be slightly to the RIGHT of the zero of main scale. The reading of the main scale against the zero of the vernier scale looks roughly 0.3 mm. Now if you move the vernier scale such that zero of vernier scale finally coincides with 20 mm mark, did you actually move the vernier scale by 20 mm? The answer is No, you moved it by a distance less than 20 mm. You actually moved it by 20 mm – 0.3 mm = 19.7 mm. But just blindly going by the reading referred by zero of the vernier tells that as if the zero of the vernier moved by 20 mm. So this is an error. Such an error is called as positive zero error. In this case, the zero error = +0.3 mm which is the difference between observed reading (20 mm) and actual movement (19.7 mm).
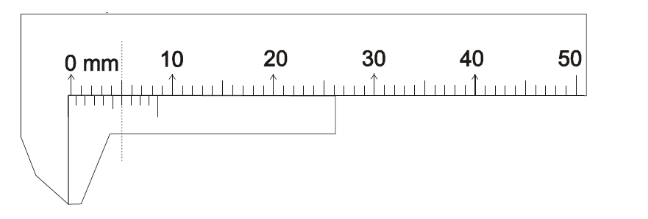
Negative zero error: When the jaws are touched, the zero of the vernier scale is to the LEFT of zero of main scale, as shown by example below.
In the above figure, you can see the jaws are touching, but zero of the vernier scale is found to be slightly to the LEFT of the zero of main scale. Here if the vernier scale is moved such that vernier zero finally coincides with 20 mm mark on the main scale, then the zero of the vernier has actually moved by a distance more than 20 mm.
This error is called as negative zero error.
To summarize:
| Positive zero error | Negative zero error | |
| When jaws touch each other | Zero of vernier is to the RIGHT of zero of main scale | Zero of vernier is to the LEFT of zero of main scale |
| Vernier scale moves between positions of jaws-touching to object-placed-between-jaws | Actual movement of vernier scale is LESS THAN that indicated by zero of vernier scale | Actual movement of vernier scale is MORE THAN that indicated by zero of vernier scale |
Formula for calculating how much is the zero error:
| Positive zero error | If there are 10 divisions on the vernier scale and nth (< 10) vernier scale division coincides with a mark on the main scale, then Zero error = +n x Least count |
| Negative zero error | If there are 10 divisions on the vernier scale and nth (< 10) vernier scale division coincides with a mark on the main scale, then Zero error = -(10-n) x Least count |
Problem 1: In a vernier calipers, when the jaws touch each other, the zero of the vernier is to the right of the zero of the main scale and 2nd division of the vernier scale coincides with a mark on the main scale. Find the zero error.
Solution: Jaws are touching, but zero of the vernier scale is found to be to the RIGHT of zero of main scale. So it has positive zero error.
So, Zero error =+2×0.1mm = +0.2mm
Problem 2: In the figure given below, main scale and vernier scale of a vernier calipers are shown for the situation when the jaws are touching each other. What is the zero error of the vernier calipers?
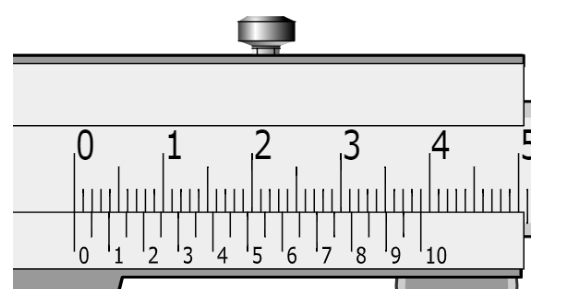
Solution: When the jaws are touching each other, the zero of the main scale and that of vernier scale coincide. Hence there is no zero error.
Problem 3: In the below situation, calculate the zero error.

Solution: Jaws are touching, but zero of the vernier scale is found to be to the LEFT of zero of main scale. So it has negative zero error. 6th vernier scale division (7th mark) coincides with a division on the main scale. So, n = 6.
So, Zero error =-(10-6)x0.1mm = -0.4mm
Zero correction
It is the correction that must be applied to the observed reading to arrive at the correct reading for length/diameter etc of an object.
Zero correction = negative of zero error.
For example, if zero error =+0.2mm, then zero correction =-0.2mm.
How to record measurements and the formula for corrected reading
From the above formula, it is clear that before you measure length of an object using a vernier calipers, you must have found:
- Least count of the vernier calipers
- Zero correction
Now keep an object (between the jaws) whose length/diameter you wish to find.
Main scale reading (MSR): When the object is held between the jaws of the calipers,
- If the zero of the vernier does not coincide with a mark on the main scale, then note the reading of the main scale which is just to the left of the zero of the vernier scale.
- If the zero of the vernier coincides with a mark on the main scale, then note the reading of that particular mark on the main scale.
This forms MSR.
Vernier coinciding division (VCD): Find which division of the vernier scale coincides with any mark of the main scale. Remember, if first mark (zero) of the vernier is coinciding, then even last mark of the vernier will coincide. In that case, note down as zero. This forms vernier coinciding division (VCD)Apply the formula, CR = MSR + VCD x LC + ZC, to get the corrected final reading.
Problem 4: When the jaws of a vernier calipers are touched, 3rd division on vernier scale coincides with a mark on the main scale and zero of the vernier is to the right of the zero of the main scale. When an object is put between the jaws, the zero of the vernier lies between 35 mm and 36 mm marks and 6th division on the vernier scale coincides with a mark on the main scale. What is the length of the object?
Solution: When the jaws are touched, zero of the vernier is to the right of the zero of the main scale.
Therefore, zero error is positive.
Zero error = 3 x 0.1 = +0.3mm
Zero correction (ZC) = -0.3mm
Main scale reading (MSR): 35mm
Vernier coinciding division: 6
CR = MSR + VCD x LC + ZC
CR = 35 + 6 x 0.1 + (-0.3) = 35 + 0.6 -0.3 = 35.3mm
Problem 5: What is the radius of the sphere using the below diagram (assume vernier scale has no zero error)?
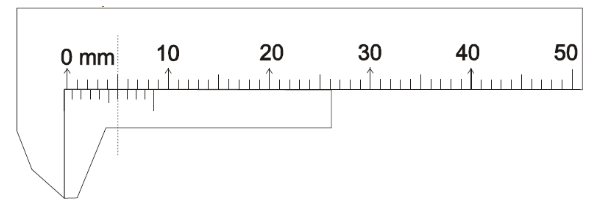
Solution: Zero of the vernier is between 11 mm and 12 mm marks of the main scale.
So MSR = 11mm
MSR = 11mm
VCD = 8
CR = MSR + VCD x LC + ZC
CR = 11 + 8 x 0.1 = 11.8mm. This is the diameter of the sphere.
Radius = 11.8/2 = 5.9mm
Vernier calipers with circular scales for measuring angles
You also have vernier calipers in the form of circular scales, for measuring angles. They have:
- Circular main scale
- Circular vernier scale
For example 9 divisions on “circular main scale” represent 9 degrees. And there are 10 divisions on “circular vernier scale”. So least count of this instrument will be
9M.S.D. = 10V.S.D.
LC = 1o – 9/10 X 0.1o
Thought-provoking question
Q. Can the accuracy of a vernier not be achieved using a single ordinary scale?
A. Yes it can be! For that we need to just divide each millimetre gap into 10 equal parts. But what would happen then is that the marks would become so close that it would become humanly difficult to resolve them with naked eye. This is the catch! If you put more marks, you get better accuracy, but human eye’s limitations hold you back. Why do we have so many alternate measuring techniques when you go to better and better accuracies? It is because human eye’s capabilities are very limited. Even with a spectacle or a lens they improve to some extent. But again a new higher limit comes and we need to devise better.
Frequently Asked Questions on Vernier Calipers
What is the principle of vernier callipers?
A two-scale arrangement in which length of n main scale divisions is made equal to length of (n+1) vernier scale divisions.
What is the least count of a vernier calipers?
Least count of a vernier calipers is 0.1 mm when 9 main scale divisions is equal to 10 vernier scale divisions.
What is the formula for least count of a vernier calipers?
Least count of a vernier calipers = 1 M.S.D. - 1 V.S.D.
How is the inner height of a hollow cylinder measured using a vernier calipers?
The cylinder is kept vertical on the table with open end upwards. First the edge of main scale is placed on the rim of the cylinder and reading is noted. Now with the help of thumbscrew, the strip is lowered into the cylinder until it touches the bottom of the cylinder. The Vernier scale is locked using the lock screw. Reading is noted again. Difference between the two readings gives the inner height of the cylinder


