To Measure Diameter of a Small Sphericallcylindrical Body Using Vernier Callipers
Aim
To measure diameter of a small sphericallcylindrical body using Vernier Callipers.
Apparatus
Vernier callipers, a spherical body (pendulum bob) or a cylinder and a magnifying lens.
Theory
If with the body between the jaws, the zero of vernier scale lies ahead of Nth. division of main scale, then main scale reading (M.S.R.) = N.
If nth division of vernier scale coincides with any division of main scale, then vernier scale reading (V.S.R.)
= n x (L.C.) (L.C. is least count of vernier callipers)
= n x (V.C.) (V.C. is vernier constant of vernier callipers)
Total reading, T.R. = M.S.R. + V.S.R. (L.C. = V.C.)
= N + n x (V.C.).
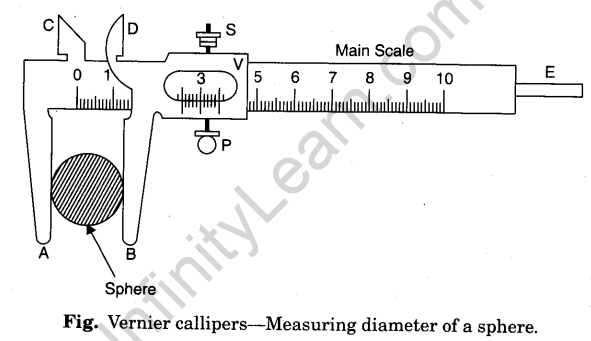
Diagram

Procedure
- Determine the vernier constant (V.C.) i.e. least count (L.C.) of the vernier callipers and record it step wise.
- Bring the movable jaw BD in close contact with the fixed jaw AC and find the zero error. Do it three times and record them. If there is no zero error, record zero error nil.
- Open the jaws, place the sphere or cylinder between the two jaws A and B and adjust the jaw DB, such that it gently grips the body without any undue pressure on it. Tight the screw S attached to the vernier scale V.
- Note the position of the zero mark of the vernier scale on the main scale. Record the main scale reading just before the zero mark of the vernier scale. This reading (1ST) is called main scale reading (M.S.R.).
- Note the number (n) of the vernier scale division which coincides with some division of the main scale.
- Repeat steps 4 and 5 after rotating the body by 90° for measuring the diameter in a perpendicular direction.
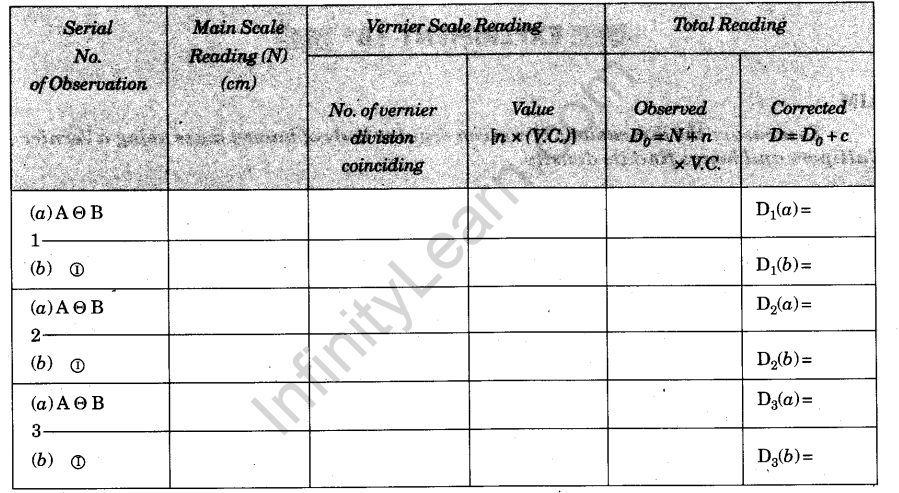
- Repeat steps 3, 4, 5 and 6 for three different positions. Record the observations in each set in a tabular form.
- Find total reading and apply zero correction.
- Take mean of different values of diameter and show that in the result with proper unit.
Observations
- Determination of Vernier Constant (Least Count) of the Vernier Callipers
1 M.S.D. = 1mm
10VS.D.=9M.S.D.
.-. 1 V.S.D. = 9/10 M.S.D. = 0.9 mm.
Vernier Constant, V.C. = 1 M.S.D. – 1 V.S.D. = (1 – 0.9) mm = 0.1 mm = 0.01 cm. - Zero error (i)……. cm, (ii)…… cm, (iii)……… cm.
Mean zero error (e) =……… cm.
Mean zero correction (c) = – e =…………cm. - Table for the Diameter (D)

Calculation
Mean corrected diameter

Result
The diameter of the given sphere/cylinder is………….cm.
Precautions
- Motion of vernier scale on main scale should be made smooth (by oiling if necessary).
- Vernier constant and zero error should be carefully found and properly recorded.
- The body should be gripped between the jaws firmly but gently (without undue pres-sure on it from the jaws).
- Observations should be taken at right angles at one place and taken at least as three different places.
Sources of Error
- The vernier scale may be loose on main scale.
- The jaws may not be at right angles to the main scale.
- The graduations on scale may not be correct and clear.
- Parallax may be there in taking observations.


