Introduction to HTML
HTML stands for HyperText Markup Language. It is a markup language, quite different from programming languages like Java, Perl, C, or BASIC. It is a way of describing how a set of text and images should be displayed to the viewer, similar in concept to a newspaper editor’s markup symbols. HTML has no compiler or interpreter and they are browser-dependent. We can create an HTML program in any text editor. Thereafter, we can run it on a browser like Internet Explorer. The file name for an HTML program should have .htm or .html extension.
Web Page
A web page consists of an HTML file with image (picture) files used on the page. The HTML file (a normal text file) contains all the text to display and also acts as the ‘glue’ to hold the text and images together in the right places and display them in the right style. Writing an HTML file means composing the text you want to display, then inserting any tags you want in the right places. Tags tell a browser to do something special like to show text in italic or bold in a larger font, show an image, or make a link to another web page.
Tags can be broadly divided into two categories:
1. Container tags
These types of tags require a pair of tags that is a starting tag and an ending tag. These tags affect the content which is capcapsulizetween the starting and ending tag.
An ending tag is similar to that of a starting tag except that, it begins with a slash (/) symbol.
Some of the container tags are given below:
<HTML>........</HTML>
<HEAD>........</HEAD>
<TITLE>.......</TITLE>
<B>.......</B>
2. Empty tags
These types of tags require only a starting tag instead of a pair of tags. i.e. it does not require an ending tag.
Some of the empty tags are given below:
<HR>
<IMG>
<LINK>
<BASEF0NT>
<BR>
<BASE>
HTML Document Structure
The basic structure of an HTML document consists of the HTML, head, title, and body elements. The four basic structure elements are always present in every HTML document. Technically, the <HTML> tag can only contain two things, a <HEAD> container tag and a <BODY> container tag. Inside the <BODY> tag, you put your whole page to display all text, images, hyperlinks, and so on, are contained between the <BODY> and </BODY> tags.
The optional <HEAD> section, placed before the <BODY> section, lets you store certain information about the document itself. When the <HEAD> section even exists at all, it might contain only the <TITLE> container tag, which says what to display in the title of the browser window, above the menu bar (if you have a graphical browser).
Basic structure of a HTML document is as follows:
<HTML>
<HEAD>
<TITLE>
This section is for the title of web page
</TITLE>
</HEAD>
<B0DY>
This section is for all that you want to show on the web page
</B0DY>
</HTML>
If you don’t want a title, leave out the lines beginning with <HEAD> <TITLE></TITLE> and </HEAD>. If this is confusing, don’t worry, just stick the text <HTML> <BODY> at the beginning of your file and </BODY> </HTML> at the end and it will magically become a legitimate HTML file.
Creating an HTML Document
To create an HTML document using Notepad, you need to follow the steps given below:
- Open Notepad by clicking at Start – * All Programs – * Accessories – * Notepad or, use the Windows key+R, then type Notepad.exe and press enter.
- Type your HTML code into your Notepad.
- To save your HTML page, click File—* Save As, and then save it with .htm or .html extension.
Accessing an HTML Document in a Browser
To access an HTML document using a web browser, follow the steps given below:
- In the browser window, click the File menu and then click on Open.
- Click browser then navigate to its location.
- When you find your file, double-click the file to open it.
Now, the HTML document runs on a web browser.
HTML Tags
Tags have a simple structure and they begin with a “<” and end with a “>”. Between the < > angular bracket is the tag name and maybe some attributes, depending on the tag. Most attributes take a value too. Some attributes are required and some are optional.
The general form of a tag is:
<TAGNAME ATTRIBUTEl=“val uel” ATTRIBUTE2=“value2” ... >
Tag names and attribute names are not case sensitive, but some attributes are case sensitive. The tag name must come first, but the order of the attributes doesn’t matter. So, you could also write this tag as
<TAGNAME ATTRIBUTE2=“value2” ATTRIBUTEl=“value1” ... >
Basic HTML Tags are as follows:
<HTML> Tag
The <HTML> tag identifies the document as an HTML document. <HTML> tag represents the root of an HTML document. So, it acts as the container tag for all other HTML elements. All HTML documents starts with <HTML> tag and ends with </HTML> tag.
Syntax
<HTML>
.
.
.
.
other HTML Elements
.
.
.
.
</HTML>
<HEAD> Tag
The <HEAD> tag defines the document header and does not affect the appearance of the document in the browser window.
The <HEAD> element can also include a title for the document.
Syntax <HEAD> Header of the document </HEAD>
<TITLE> Tag
The <TITLE> tag defines the title of the document. It is placed between <HEAD> and </HEAD> tags. Each document can have only one title which should identify the document content in a general way. The title is not a part of the document text and cannot contain hypertext links or special markup commands. It must be simple text.
Syntax <TITLE> Title of the Page </TITLE>
<BODY> Tag
The <BODY> tag defines the largest part of the HTML document, i.e. the body. This tag contains all the major content of the document. It contains all the content of an HTML document, such as text, images, lists, tables, hyperlinks, etc.
Syntax <B0DY> Body of the document </BODY>
Heading (HI H6) Tags in HTML
There are six levels of headings in HTML, which are numbered 1 to 6. The 1 numbered heading is the largest and bolder in fonts than normal body text. The first heading in each document should be tagged <H1>
Number 1 to 6 specify the level of heading and attribute ALIGN sets the heading on the left side, right side, or at the center.
If ALIGN = RIGHT,    then the heading is aligned at RIGHT
   ALIGN = LEFT,     then the heading is aligned at LEFT
   ALIGN = CENTER,   then the heading is aligned at CENTER
Hi……..H6, represents different levels of headings. They each are differ by some factors such as typeface, font size and the space. Sample code to illustrate the use of headings is as follows:
<HTML>
<HEAD>
<TITLE> Heading in HTML </TITLE>
</HEAD>
<B0DY>
<H1 ALIGN = “CENTER”> Level 1 Heading </Hl>
<H2> Level 2 Heading </H2>
<H3 ALIGN = “RIGHT”) Level 3 Heading </H3>
<H4> Level 4 Heading </H4>
<H5 ALIGN = "CENTER”) Level 5 Heading </H5>
<H6> Level 6 Heading </H6>
</B0DY>
</HTML>
Output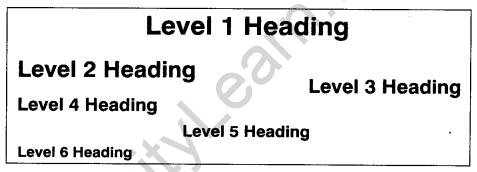
Paragraph <P> Tag
This tag is used to add space between paragraphs and this is a container tag. The align attribute specifies the alignment of the text within a paragraph.
Syntax <P ALIGN = “Left/Right/Center/Justify”)
To end a line and also show a blank line before beginning anything else, use a paragraph marker <P>.
Line Break <BR> Tag
The <BR> tag (or Line Break tag) is used to simply end the current line and jump to the next line. The <BR> tag is useful for writing addresses.
Syntax <BR>
Horizontal Rule <HR> Tag
<HR> tag is used to separate the field into two sections by forming a rule or line. A separate section is formed and the size of the different sections can be fixed. The <HR> tag produces a horizontal line spread across the width of the browser window.
Syntax <HR>// for normal horizontal rule.
The default size of the Horizontal Rule is 3 pixels.
Horizontal rule having size 12 pixels, 36 pixels and 72 pixels are given below:
<HR SIZE = 12>
<HR SIZE = 36>
<HR SIZE = 72>
<FONT> Tag
The <FONT> tag is used to change font sizes, font colors, and font styles of the text in your web pages, but it is deprecated in HTML 4.0 in favor of Cascading Style Sheets (CSS). The <FONT> tag provides no real functionality by itself but with the help of a few attributes, (i.e. size, color, and face) it provides functionality. The size, color, and face attributes can all be used at once or individually, providing users with the ability to create dynamic font styles for any HTML element.
Font Size
The <FONT> tag uses the size attribute to specify the relative or absolute size of the text. The size of the font ranges from 1 (very small) to 7 (very large).
Syntax <FQNT SIZE =“2”> text </F0NT>
A number from 1 to 7 defines the size of the text. By default, the font size is 3
Font Color
The color attribute defines the color of the text inside an <FONT> element. To change the text color, you need to add the attribute color to the opening font tag and assign it a value for the color. The color values can be given either as standard color names e.g. red, blue, black, etc., or as RGB components e.g. # 000099. The RGB components are denoted by a preceding # sign followed by a six_digit hex number.
Syntax <F0NT COLOR = “color name/RGB value of color”>
Font Face
The face attribute defines the font or style of the text inside an <FONT> element. To change the font style from the default to a different style, simply add the attribute FACE to the opening FONT tag. As value for the face attribute, you can use any specific font name such as “Verdana”, “Arial” and many more. The font face value is case insensitive.
Lists
HTML offers a mechanism for specifying lists of information. All lists must contain one or more list elements. The most common HTML lists are ordered and unordered lists.
1. Ordered lists
These are also known as numbered lists and lists items that have a specified numerical order or ranking.
An ordered list starts with the <OL> tag and each list item starts with the <LI> tag.
e.g.
<0L>
<LI>Coffee</LI>
<LI> Milk </LI>
<LI>Tea </LI>
</0L>
The above HTML code in a browser looks like:
- Coffee
- Milk
- Tea
2. Unordered lists
These are also known as bulleted lists because they have small bullet icons in front of the list items.
These are used for lists that do not require any order.
An HTML list starts with the <UL> tag and each list item starts with the <LI> tag. These
items are marked with bullets (typically small black circles).
e.g.
<UL>
<LI>Coffee </LI>
<LI>Milk </LI>
<LI>Tea </LI>
</UL>
The above HTML code in a browser looks like:
- Coffee
- Milk
- Tea
Comments
You can put comments in your HTML file that won’t display the text within the comments on the web page. This lets you explain why your HTML code is a certain way, to anyone viewing your HTML source code. This may be someone else or (more likely) it may be you at some point in the future. Start comment with
"<!- - " and end it with "- ->", like
<!- - This is a comment and won’t be displayed to the user -->
<!- - comment examples inserted by JSM on 9-23-96, for clarity -->
Do not put private information in comments, as anyone viewing the source code can easily see them. Also, do not put HTML tags inside your comments, since most browsers will think the comment ends with the first “>’ character.
Tables
We can create tables and display text, numbers, etc., in tabular form:
- Tables are defined with the <TABLE> container tag.
- The <TABLE> tag contains rows of cells, defined with the <TR> container tag.
- Each <TR> tag contains data cells, defined with the <TH> and <TD> container tag.
- Each data cell contains whatever you want i.e. links, images, lists, or even other tables.
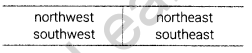
Rows are defined from top to bottom and cells are defined from left to right. If you want lines to show up between the table cells, use the border attribute in the <TABLE> tag.
e.g. <TABLE border>
<TR>
<TD>northwest</TD>
<TD>northeast</TD>
</TR>
<TR>
<TD>southwest</TD>
<TD>southeast</TD>
</TR>
</TABLE>
It will be rendered as
Most browsers do not require the ending </TR> or </TD> tags; they assume one cell or row ends when the next one begins. So, you might see tables written without those end tags (though the </TABLE> end tag is still required).
Note As of October 1996, this may cause trouble with nested tables, due to a browser bug.
Cells that Span Multiple Columns or Rows
Sometimes, you may want one cell to span more than one column across or more than one row deep. In these cases, use the colspan and rowspan attributes of the <TD> tag. Then, just skip defining the cells that the large cell would overlay.
e.g.
<TABLE B0RDER=2>
<TR>
<TH R0WSPAN=3 B6C0L0R=“#99CCFF”>Production</TH> <TD>Picture</TD>
<TD>1234</TD>
</TR>
<TR>
<TH C0LSPAN=3 BGC0L0R=“#99CCFF”>Production</TH> </TR>
</TABLE>

It will be rendered as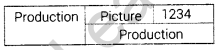
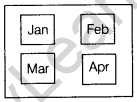
Cellspacing and Cellpadding
The cell spacing tag is used to create space between different cells within your table and the cell padding tag controls or sets the amount of space between the contents of the cell and the cell wall. By default, cell padding is 1. Cellpadding is usually more effective than cell spacing for spreading out the content of the table.
e.g.
<HTML>
<B0DY>
<TABLE BORDER =“1” CELLSPACING = “10” CELLPADDING=“15”> <TR>
<TD>Jan</TD>
<TD>Feb</TD>
</TR>
<TR>
<TD>Mar</TD>
<TD>Apr</TD>
</TR>
</TABLE>
It will be rendered as
Aligning Cell Contents within the Cells
Usually, all cell contents are left justified and vertically centered by default. To set the horizontal or vertical placement within the <TD> tag, use the align and valign attributes, respectively.
- align can be left, right or center.
- valign can be top, middle, bottom or baseline (aligned to baseline of the text).
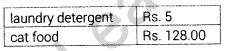
e.g. this borderless grocery receipt lines up the prices on the right margin
<TABLE>
<TR>
<TD>Iaundry detergent</TD>
<TD ALIGN ="right”>Rs. 5</TD>
</TR>
<TR>
<TD>cat food</TD>
<TD ALIGN=“right”>Rs. 128.00</TD>
</TR>
</TABLE>
It will be rendered as
You can also use the align and valign attributes in the <TR> tag, to affect all cells in that row.
Forms
Forms start with the <FORM> tag and end with the </FORM> tag. In the form, you can still put any HTML code you want, but you can also use these tags to define input fields that contain interactive controls that enable a user to submit information to a web server.
The following tags are used to define the input fields:
- <INPUT> defines text entry fields, checkboxes, radio buttons, or push buttons.
- <SELECT> defines drop-down menus and selection boxes.
- <TEXTAREA> defines multi-line text entry fields.
The <FORM> tag has - An action attribute is the URL of the CGI script to send the form data.
- A method attribute is the HTTP method used to submit the form data.
So, a typical <FORM> tag is
<F0RM ACTI0N= “http://www.myhost.com/mypath/myscript.cgi” METHOD=post>
Every input field in a form has a name, defined by the name attribute of the <INPUT>, <SELECT>, or <TEXTAREA> tag. Every input field also has a value, which the user sets by typing in it or clicking on it. The entire set of form data is represented as a set of these name-value pairs when it is submitted to the CGI script. Empty text fields are sent as name-value pairs with a value of an empty string, but checkboxes and radio buttons that are not checked are not sent at all. To test your form, you can call simple scripts at NCSA (National Center for Supercomputing Application) that tell you what name-value pairs were submitted. To do this, set the action attribute to the following:
-
For get submissions: http://hoohoo.ncsa.uiuc.edu/cgi-bin/query
- For post submissions: http://hoohoo.ncsa.uiuc.edu/cgi-bin/post-query
<INPUT> Tag
Use the <INPUT> tag to create most form fields, as well as submit and reset buttons. It has a varying set of attributes depending on the type attribute, which can be of any type:
- text a normal text entry field (default).
- password identical to text, but the user’s typing is not displayed.
- checkbox a box (for simple ON/OFF values).
- radio a radio button (for choosing one of several choices).
- submit a button that submits the form data, when user input is done.
- reset a button that resets all form fields to their initial values.
- image like submit but shows an image as the button. •
- hidden lets you define extra name-value pairs to be sent to the CGI script, but not displayed.
(i) text and password fields have the following optional attributes:
- value sets a default value for the field.
- size sets the displayed length of the field.
- max length sets the maximum amount of data that can be entered.
(ii) checkbox and radio fields have the following optional attributes:
- value it contains the value either ‘ON’ or ‘OFF’ the default is the word ‘ON’.
- checked (no value needed) means it’s checked by default.
(iii) submit and reset fields use the optional value attribute as the label on the button.
(iv) image field requires an src attribute with the URL of the image to use and it supports most attributes the <img> tag does.
(v) The hidden field uses the name and value attributes to define a name-value pair. Use it to send data to the CGI script that the user doesn’t need to know. Do not use it for secret data, since the user can always view the source code.
To create a set of radio buttons, give them all the same name but different values. Only the selected value will be sent to the server when the form is submitted. Usually, you will have text before or after text, password, checkbox, and radio fields, to label them for the user. No label is shown automatically.
The submit and image fields can have a name attribute, to send information about how the form was submitted. If you have multiple submit buttons, your CGI script can distinguish them by their different names or values (only the submit button you click is sent as a name-value pair). If an image field has a name attribute of (let’s say) ‘att’, then the XY-location of the mouse click on the button is sent as two integer fields, with names of ‘att. x’s and ‘att. y’. This effectively allows an image map with an image button.
e.g. of <INPUT> fields, in the same order as listed above, are
State: <INPUT type=text name=“state” value=“CA” size=“2” maxlength=“2”> Password: <INPUT type=password name=“password”>
<INPUT type=checkbox name=“moreinfo” va1ue=“yes” checked>Send me more info. Select your gender below
<BRXINPUT type=radio name=“gender” value=“F”>Female <BRXINPUT type=radio name=“gender” value=“M">Male <BRXINPUT type=radio name="gender” value=“0”>0ther <INPUT type=submit value=“0K, let’er rip1”>
<INPUT type=reset value=“ Whoops-- erase that”>
<INPUT type=image src=“/images/gobutton.gif” width=“60” height=‘‘30”>
<INPUT type=hidden name=“totalsofar” value=“1290.65”>
<SELECT> Tag
Use the <SELECT> container tag to create drop-down menus and scrolled lists. Between <SELECT> and </SELECT>, you can only have <OPTION> tags and their text, which define the items in the list. The <SELECT> tag has a name attribute, like every input field. Other optional attributes are as follows:
- size is the displayed height of the list. If it is 1 (or omitted), the list is a drop-down menu, otherwise, it is a scrolled list.
- multiple (no value) lets the user select multiple items from the list (usually with Ctrl+click or Shift+click). Each selected item will be sent as a name-value pair to the CGI script.
<OPTION> Tag
A <OPTION> tag can have a value attribute, which is what is sent to the CGI script if that item is selected. If there is no value attribute, the value sent is the text following the <OPTION> tag.
To make an item selected by default, use the selected attribute in the <OPTION> tag.
e.g. Choose your favourite color:
<SELECT name="favcolor”>
<OPTI0N>green
<OPTION>aquamarine
<OPTION selected>emera1d
<OPTION>turquoise
<OPTI0N>aqua
<OPTION value=“green2”>green
<OPTION value=“green3”>green
</SELECT>
<TEXTAREA> Tag
Use the <TEXTAREA> container tag to create multi-line, scrollable, text entry boxes. Whatever will be placed between the <TEXTAREA> and </TEXTAREA> tags will be the initial contents of the entry box, so put them right next to each other, if you do not want initial contents.
The <TEXTAREA> tag has a name attribute, like every input field. Use the rows and cols attributes to set the displayed height and width of the text area.
Note The Textarea scrolls as much as needed, so you’re only setting the display size, not the data size, e.g. an <TEXTAREA> entry field is
<TEXTAREA name=“stuff” rows=‘‘10” col s=“60”>Enter stuff here/TEXTAREA>
Special Characters
How do you display the < and > characters? If you just type them in your HTML file, the browser will think you are starting or ending a tag. You have got to escape the characters, as it’s called, by typing special sequences of characters in their place. When displaying your page, the browser translates the sequences back into the characters you need.
All special character sequences start with *&’ (ampersand) and end with V (semicolon) and in between is the name of the special character, e.g. ‘>’ means the greater than symbol, ‘<’ means the less than symbol, ‘"’ means double quotes and ‘&’ means the ampersand itself, e.g. the line to display the < character, use the sequence <
Hyperlinks
Hyperlinks are used to navigate between web pages of a website. To create a hyperlink we have to use the anchor tag (<a>…</a>).
The href attribute of the anchor tag is used to provide the web page location you want to jump to.
e.g. <A href=“NextPage.htm”>Click Here </A>
Linking to the Middle of a Page
To link to another part of the same page or the middle of another page, first, create a named anchor at the point you want to link to. Do this with the <A> tag and the name attribute, like
<A name = “anchor name”> </A>
Note The different use of the <A> tag; in fact, <A> was originally short for the anchor. Since the anchor just marks a point on the page, you don’t need to put anything between <A> and </A>.
Once the anchor exists at the target location, link to it with the <A href> tag, appending “#anchorname” (the URL fragment) to the target URL, like
Read about <A href =“http://www.jmarshall.com/easy/html/#lists”>HTML lists</A>.
Which is rendered as Read about HTML lists.
To point somewhere else on the same page, leave out the rest of the URL altogether.
e.g. <A Href = “#toc”> Back to table of contents</A>
is rendered as
Back To Table Of Contents
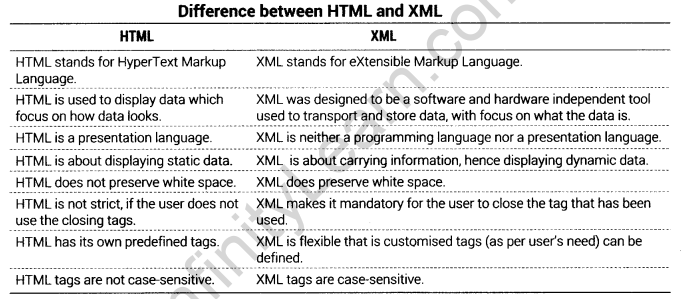
Introduction to XML
extensible Markup Language (XML) is a simple, very flexible text format derived from SGML, designed especially for web documents. The XML standard was created by W3C to provide an easy-to-use and standardized way to store self-describing data. It allows designers to create their customized tags, enabling the definition, transmission, validation, and interpretation of data between applications and between organizations.
Applications of XML
- Web publishing XML allows you to create interactive pages, allows the user to customize the pages, and creates e-commerce applications more intuitive.
- Web searching and automating web tasks XML defines the type of information contained in a document, making it easier to return useful results when searching the web.
- General applications XML provides a standard method to access information, making it easier for applications and devices of all kinds to use, store, transmit and display data.
- Business applications XML provides implementations to make Electronic Data Interchange (EDI) more accessible for information interchange, business to business transactions, and business to customer transactions.
- Metadata applications XML makes it easier to express metadata in a portable and reusable format.
XML Editors
The basic job of an XML editor is to allow you to create and manipulate XML documents. The basic features which you need are syntax highlighting, color code to make XML easier to read and understand.
Free XML editors
- XML cooktop.
- XMLmind Standard Edition.
- Peter’s XML Editors.
Features of XML
- XML are the text files that can be managed by any text editor.
- XML is widely used as a format for document storage and processing, both online and offline.
- The XML document which uses the DTD has the XML tags in it. It is in the XML document, the tags or the elements are defined for the data.
- XML is extensible because it only specifies the structural rules of tags. No specification on tags themself.
- XML provides a gateway for communication between applicants.
- It can represent common computer science data structure records, lists, and trees.
- It is platform-independent, thus relatively immune to changes in technology.
- XML does not allow references to external data entities, named, character references which are not allowed in XML.
- XML does not allow empty comment declarations.