Table of Contents
The micrometer least count is 0.01 mm, but this can vary based on the type and model. Some micrometers, particularly electronic ones, offer a finer least count of 0.001 mm. It’s important to understand the specific least count of each type for accurate measurements.
Micrometer Least Count Definition
Micrometer Least Count is defined as the smallest measurement increment that the instrument can accurately read. It is the value of the smallest division on the micrometer’s scale. For instance, if the least count is 0.01 mm, the micrometer can measure differences as small as 0.01 mm between readings.
This precision may vary depending on the type and model of the micrometer. Traditional mechanical micrometers typically have a least count of 0.01 mm, while more advanced electronic micrometers can have a finer least count, such as 0.001 mm. Understanding the least count is crucial for achieving precise measurements in various applications.
List of Various Micrometer least counts in mm
| Micrometer Type | Least Count |
| Outside Micrometer | 0.01 mm to 0.001 mm |
| Inside Micrometer | 0.01 mm |
| Depth Micrometer | Around 0.01 mm |
| Digital Micrometer | 0.001 mm |
| Blade Micrometer | 0.01 mm |
| Screw Thread Micrometer | 0.01 mm |
| Point Micrometer | 0.01 mm |
| Vernier Micrometer | 0.02 mm |
| Universal/Multi-Anvil Micrometer | Around 0.01 mm |
| Analog Micrometer | Typically 0.01 mm |
To learn how to calculate the least count of a micrometer, you first need to understand what a micrometer is, its various parts, how to use it, and its applications.
Also Check: Vernier Caliper Least Count
What is Micrometer?
The least count is the smallest value that a measuring instrument can accurately read or display, indicating its precision. For instance, a ruler with millimeter divisions has a least count of 1 millimeter, meaning it can measure to the nearest millimeter. Similarly, a micrometer with 0.01-millimeter divisions has a least count of 0.01 millimeters, allowing for more precise measurements.
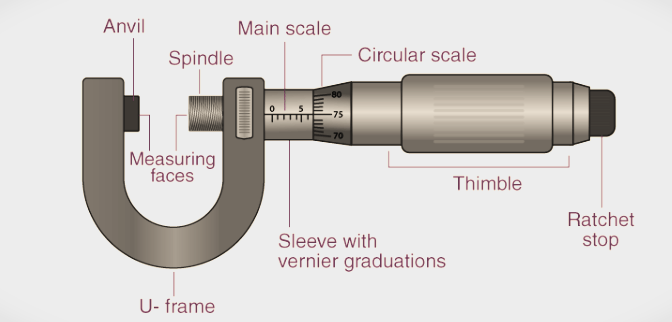
Parts of micrometer

- Frame: The frame, typically C-shaped, holds the anvil and barrel in a fixed relation to each other, ensuring stability during measurements.
- Anvil: The fixed part against which the object being measured is placed, providing a stable surface for accurate measurement.
- Spindle or Barrel: This component moves towards the anvil when the thimble is rotated, enabling precise adjustments.
- Thimble: Rotating the thimble moves the spindle towards the anvil. It often includes a ratchet stop for precise control of the applied pressure.
- Sleeve: The sleeve houses the barrel and spindle assembly, providing support and alignment.
- Screw (Ratchet): The screw provides fine adjustments necessary for accurate measurements, ensuring precision.
Also Check: Screw Gauge
Applications of Micrometer
Micrometers are essential tools for precise dimensional measurements across various fields, from manufacturing to research and development.
- Manufacturing Industry: Widely used for accurate measurements of component dimensions, ensuring products meet exact specifications.
- Engineering: Vital in mechanical, electrical, and civil engineering for precise measurements during design, production, and quality control.
- Science Laboratories: Commonly used in labs to measure small objects with precision, such as wire diameters and material thickness.
- Metalworking and Machining: Indispensable for measuring machined parts to ensure they meet precise specifications.
- Automotive Industry: Used to measure engine parts, shafts, bearings, and other critical components for accuracy and reliability.
- Aerospace and Defense: Essential for measuring precision components in aircraft, missiles, and other aerospace systems.
Also Check: Vernier Calipers
Micrometer Least Count Formula to Calculate
To calculate the micrometer Least count, you can use the formula:
LC = PITCH / NUMBER OF CIRCULAR DIVISIONS
- LC = Least count
- Pitch = It is the distance moved by the screw per revolution (typically the smallest division on the main scale).
- Number of circular divisions = The number of divisions on the circular scale
For example:- if the pitch of the micrometer screw gauge is 1 mm and there are 200 circular divisions, the least count would be
Least count = 1/200 =0.02 mm
FAQs on Micrometer Least Count
What is the least count of vernier caliper and micrometer?
The least count of a vernier caliper is typically 0.02 mm, while the least count of a micrometer is usually 0.01 mm.
What is the least count of micrometer screw gauge?
The least count of a micrometer screw gauge is generally 0.01 mm.
What is the outside micrometer least count?
The least count of an outside micrometer is typically 0.01 mm.
What is the manual micrometer least count?
The least count of a manual micrometer is usually 0.01 mm.
What is the inside micrometer least count?
The least count of an inside micrometer is typically 0.01 mm.
What is the least count of micrometer?
The least count of a micrometer is generally 0.01 mm.
What is analog micrometer least count?
The least count of an analog micrometer is typically 0.01 mm.
How to calculate least count of micrometer?
The least count of a micrometer is calculated by dividing the pitch of the screw by the number of divisions on the thimble. For example, if the pitch is 0.5 mm and the thimble has 50 divisions, the least count is 0.5 mm / 50 = 0.01 mm.
What is the least count of vernier micrometer?
The least count of a vernier micrometer is typically 0.001 mm.
What is the micrometer least count in cm?
The least count of a micrometer in centimeters is 0.001 cm (equivalent to 0.01 mm).


